Hyper-V USB Passthrough
A virtualization platform for Windows operating systems, Hyper-V, may be your way to use one or several virtual machines on your physical computer. It allows users to virtualize various equipment, thus, extending your functional abilities within a virtual network.
Yet, there are some limitations in Hyper-V, such as the inaccessibility of devices physically connected to your host system. So, you’ll need to configure a Hyper V USB passthrough to get the most out of your VM.

You can choose between at least four ways to tune it up, including the easiest method – the HighFigure USB passthrough Hyper-V application. Let’s cover each method in detail:
- Server-side method via SCSI Controller.
- Client-side method (Enhanced Session Mode).
- Hyper-V USB device passthrough via RDP.
- Network Redirection method.
Learn how each approach works and choose one that will suit you the most.
Server-Side Method
Let’s start with the Server-side method of transmitting peripherals to VM, which is based on the SCSI Controller. In a nutshell, it allows a user to enable a USB device on a virtual machine as if it were plugged into it physically.
This SCSI Controller approach will work for Windows and Linux virtual machines. The spectrum of connectable devices is limited to the storage ones. None of them can be detachable, and each can be used either by the host system or a VM.
However, the main disadvantage of the server-side USB passthrough Hyper-V method is its complexity. Working out a proper configuration may be too puzzling for some users. Still, let us describe how to switch it on.
How to Access Devices via Server-Side USB Passthrough to Hyper V
Take the following actions to tune up the connection to a chosen device:
- Use the Windows + R combination to open Programs. Launch diskmgmt.msc. Another way is to run the Disk Management application – you can pick it from the Start menu.

- In the Disk Management interface, choose the host machine USB drive. Right-click on it and put it into the offline mode.
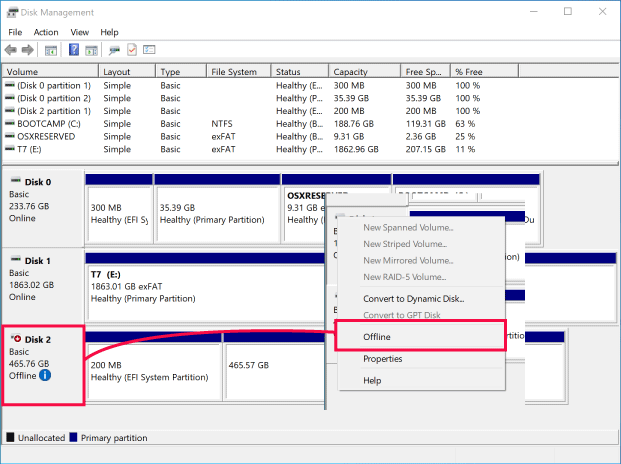
This step is necessary since you cannot use the USB drive on both host and virtual machines at once. So, you’ll only be able to configure Hyper V USB passthrough if the option is offline on your host system.
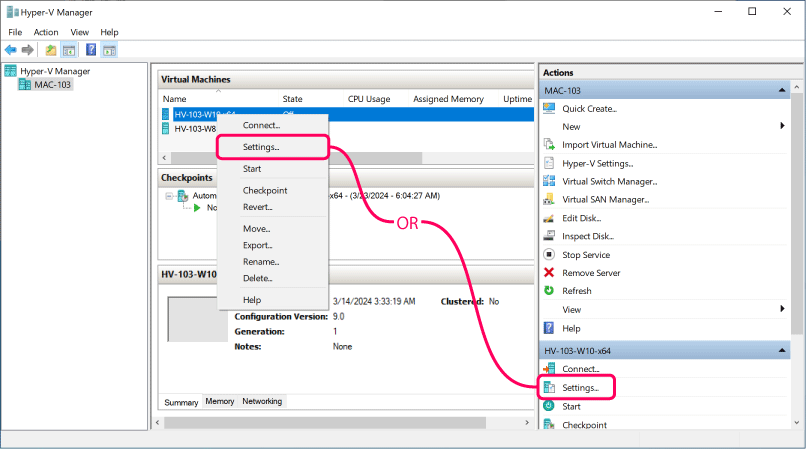
- Go to the Hyper V manager.
- Right-click on the necessary VM and tap Settings in the context menu.
- Press the SCSI Controller line in the Hardware section on the left.
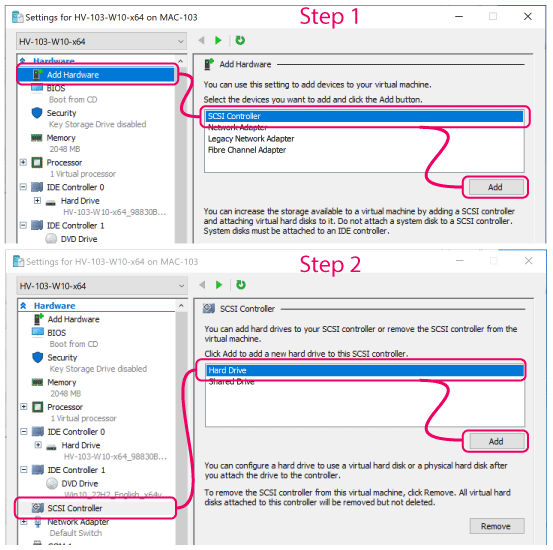
- You’ll see a window with Hard Drive options. Press the Add button below it.
- Select SCSI Controller → Hard Drive → USB drive.
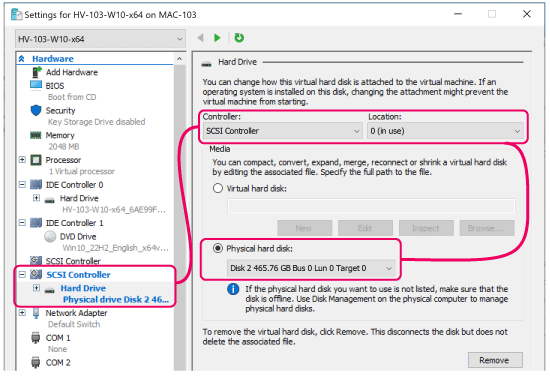
Here, you have to be attentive and pick the very disk you switched to the offline mode on the host machine. Press OK.

- Open File Explorer on your Hyper V machine. You’ll find the chosen disc available in the menu.
You can configure Hyper-V USB passthrough without dealing with the SCSI Controller. That is, you can attach the hard drive to the IDE Controller instead. Yet, you’ll need to shut your VM off to disconnect the drive.
Client-Side Method
The Client-side method based on the Enhanced Session Mode has several advantages over the Server-side approach. First, it makes the same USB drive accessible to several machines. Second, this method of Hyper V passthrough USB connection lets you use a broader set of peripherals, including scanners and printers. Finally, the Enhanced Session Mode works automatically on Hyper-V machines with Windows 8.1 and 10 operating systems, thus making the access process easier.
Although the approach is a bit easier to configure than the Server-side one, drawbacks are still present here. Thus, the option only supports Windows as a guest machine OS. Additionally, the needed USB gadgets should be chosen in advance, that is, before you run your VM.
How to Use the Client-Side Approach
Let’s observe the step-by-step process of creating HyperV USB passthrough via Enhanced Session Mode.
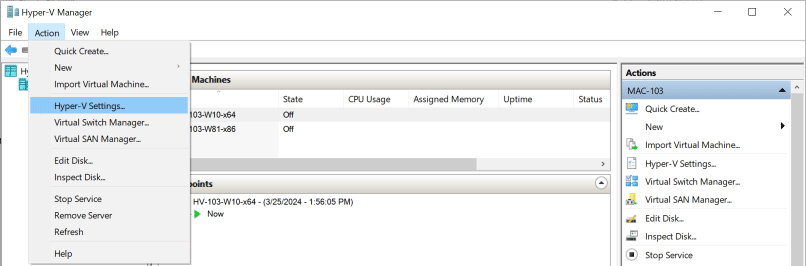
- Run the Hyper V Manager on the host machine.
- Click the host system name and opt for the Hyper V Setting in the context menu.
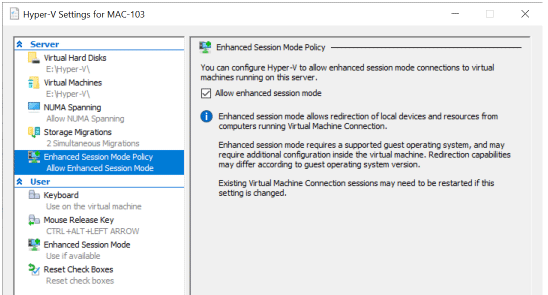
- Start with the Server menu on the left. Click “Enhanced Session Mode Policy” and enable it by ticking the corresponding field in the main window.
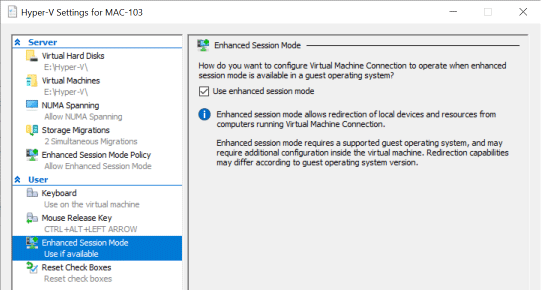
- In the User menu below the Server settings, choose “Enhanced Session Mode” and also allow its usage.
- Finish all sessions on HyperV VM.
- Go to “Hyper V Manager” and double-click the VM name.
- Choose “Show Options” → “Local Resources” → “More” → “Local Devices and Resources.”
- Enable “Other supported plug & play devices” and “Devices that I plug in later” by pressing OK.
- Save the newly created configuration in the “Display” menu and tap “Connect.”
- Launch the Hyper V virtual machine. The available devices will be visible in “File Explorer.”
This method requires strict adherence to the procedure. Many users may find it inconvenient and insufficient.
RDP Approach
An alternative way to create Hyper V USB passthrough is via RDP, Remote Desktop Protocol. While VMConnect protocols used in the above-explained methods give access to devices connected to the host system, RDP allows you to reach the ones plugged into the client machine. However, if the RDP mode is active, you can access all the devices available within the remote access network.
The bad news about this approach is that it only supports Windows OSes. Moreover, many devices may remain invisible anyway.
RDP Settings for USB Hyper V Passthrough
The following steps are needed to activate HyperV USB passthrough via RDP:
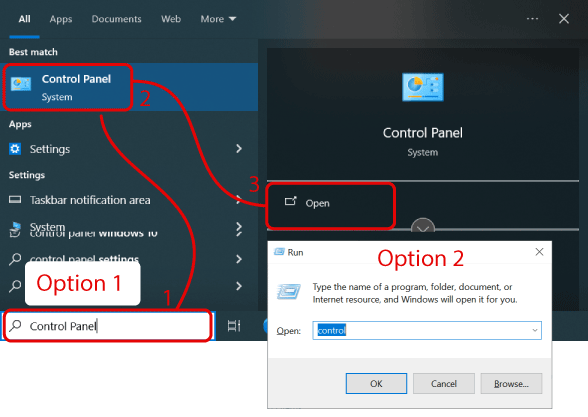
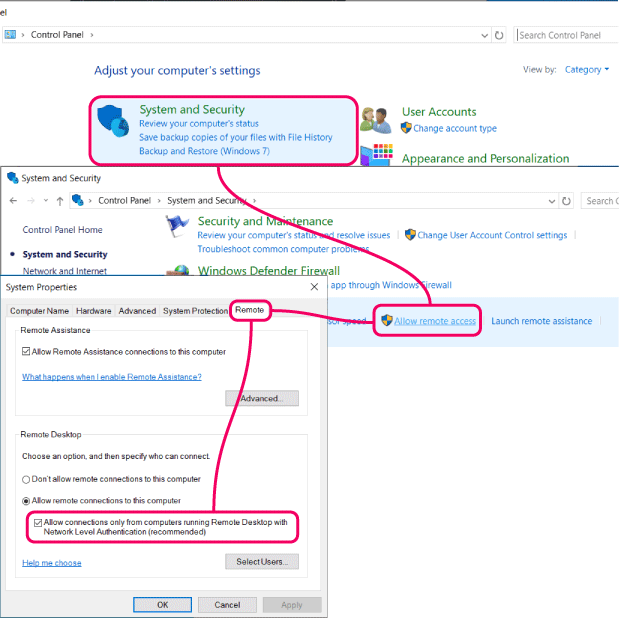
- Run the VM and go to the “Control Panel” → “System” → “Security options.”
- Tick “Allow remote connections to this computer” and “Allow remote assistance connections.” Press “OK.”
- Type Windows + R and insert mstsc.exe. Press Enter to run the Remote Desktop Connection app, which is necessary to tune up the RDP-based Hyper V USB passthrough.
- Unfold the Show Options menu and opt for “Local Resources” → “More” → “Local Devices and Resources.”
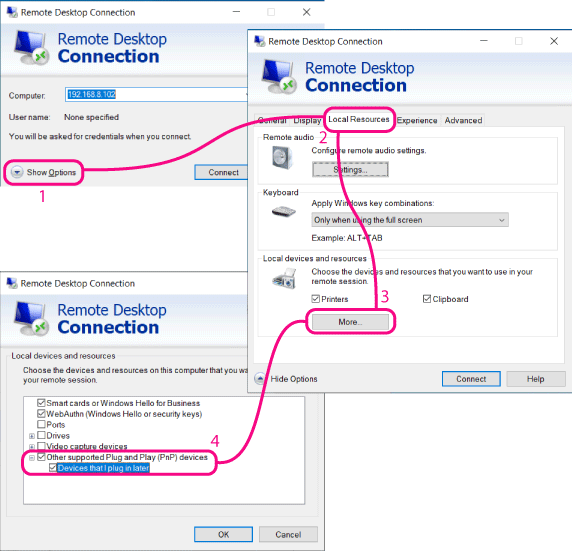
- Allow “Other supported plug & play devices” and tap “OK.”
- Return to General Settings.
- Launch your VM by providing its User name and IP in the corresponding fields.
- Press “Connect” to activate the Remote Desktop.
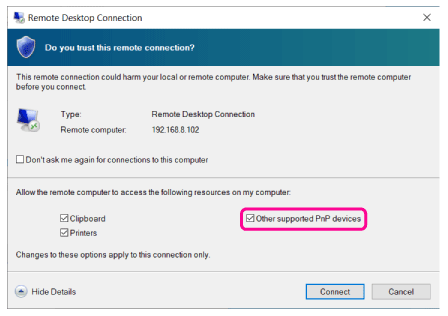
- Log in to your virtual machine – your USB connections are ready.
Now, you can open File Explorer. There, you’ll see the gadgets accessible on your VM. The method also allows users to share USB devices via Hyper-V.
USBoNet Network Redirection
Cannot configure your Windows 11 Hyper V USB passthrough? Need a way to share devices between your virtual machines? Have you wasted your time tuning up Hyper-V USB passthrough on Windows 10, and the necessary equipment is still inaccessible? The USBoNET application can be a workable solution to these and similar issues.
The app is compatible with Microsoft software and offers an easy-to-use interface with all settings and configurations ready. If you allow Hyper-V passthrough USB connections via USBoNet, you’ll ensure access to the broadest set of devices, from webcams to pen drives. Finally, thanks to port virtualization, you will be able to create a remote access network in which any computer with physical ports can become the host machine.
Access USB Devices Easily via USBoNet
You’ll be able to access and share USB devices on Hyper-V machines if you take these simple steps:
- Download & install USBoNet from HighFigure on both host and virtual machines.
- Run the app and opt for Device.
- Choose gadgets to share.
- On your VM, launch USBoNet.
- Find shared peripherals in the Device menu.
- Press Allow Access to start using them.

That’s it! Your Hyper V USB passthrough is configured, and you can use whatever devices on your virtual machine. All the required steps are simple, and you do not need to work out any extra configurations to connect a gadget to your VM. This is a crucial advantage of USBoNet.
The app offers other useful options as Gate Mode and WebAdmin. They allow for centralized management of your network, no matter how many machines are connected to it. USBoNet is not only a simple way to access devices. It ensures secure exchange of data and protects you against device or data damage.Although you need to create a network to tune up Hyper-V passthrough USB via network redirection method, the USBoNet software approach will let you use numerous operating systems (Android, Linux, Mac, etc.) You’ll access literally any USB device within the network.