USB Passthrough VMware
The functional possibilities of VMware solutions are undoubtful. Still, IT creatives know the platform’s weak points well, one of which is the absence of a native configuration for the USB-allowing process on your virtual machine. Although it is technically possible to develop one, you’ll need to beat your brains out over the settings to get some devices connected.
Another way is to install a VMware USB 3 passthrough on your computer. When using high-quality software like USBoNet from HighFigure, you won’t need to configure anything. You’ll get a smooth interface with all settings ready. One click, and you see all the devices plugged into your physical machine available on your VM.
Want to know the benefits of the USB passthrough VMware dedicated software? In this blog, we’ll explain the app’s key features and how to tune up the USB connection to your virtual network via the app.

Non-Software Method
If you are in VMware for a while, you might have tried to configure the settings for exchanging data via various USB devices. The thing here is that the allowing process is not so complicated, but with all settings prepared, you won’t be able to use all the needed devices anyway.
This is due to a very limited list of supported USB peripherals. Still, let us guide you through the manual procedure of redirecting the USB from your host system to the VMware machine.
How to Use USB Passthrough without Specialized Software
Do you not see the needed USB equipment on your virtual machine? You can manually enable devices on your VM if you debug several system components that take part in the VMware passthrough USB connection process:
Arbitrator
You’ll have to deal with the system’s Arbitrator since this component processes connection requests. It serves to transmit USB devices in a certain direction. In your VMware ESXi system, it may run up to 15 controllers.
Controller
Controllers are used to direct port buses and can be of several types. VMware supports EHCI+UHCI and xHCI controllers, which comply with 1.1/2.0 and 1.1/2.0/3.1 devices, respectively. Pay attention to the fact that you can employ only one controller of this or that sort at once.
USB Device Plugged-in Physically to Host Machine
Your ESXi host system supports 20 devices, and up to 20 of them can be redirected to every VMware machine in your network. However, you cannot boot a separate virtual machine from a VMware passthrough USB device.
Knowing all this, you can take these steps to tune up device connections to your VM manually:

- Open the Inventory folder.
- Choose the necessary virtual machine and go to Edit Settings.
- Select Virtual Hardware.
- Go to the Add New Device menu.
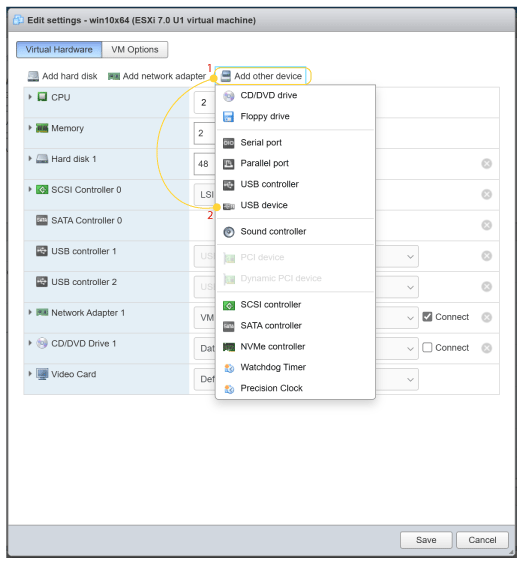
- Choose Host USB Device from the menu.
- Observe the options located next to the New Host USB Device field. Tick the one you need to enable on your VM.
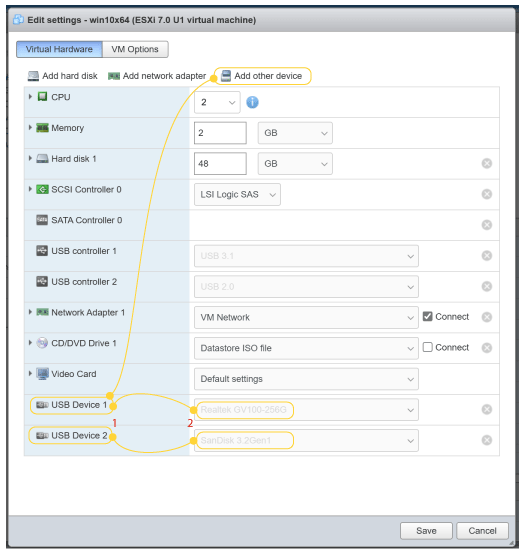
- An optional step: you can disable the ‘Support vMotion while device is connected’ option to enhance your system’s performance and stability. Surely, you should skip this step if you’re going to migrate the VM.
- Press OK to finish the procedure.
The process is simple enough, but all actions require particular discretion. Thoughtless manipulations may lead you to data losses. So, explore the extra rules to follow when tuning up USB passthrough VMware redirections.
First, never switch your VM into the waiting mode while processing the exchange of data. Do not add virtual CPU or memory to the virtual machine via the USB passthrough VMware devices. The same is true for PCI peripherals. Finally, if you need to change arbitrator settings, make sure to part all the devices connected via port virtualization from the VM.
So, if the above-explained procedure does not perplex you, opt for this method without attaching any side software. The main benefit of this USB passthrough VMware solution is that it is absolutely free. You won’t have to set up any extras in this case.
Still, the drawbacks are significant. First, users with less experience may experience data damage and losses if they take an incorrect action accidentally or through ignorance.
Supported Devices in VMware
Another factor against the native USB passthrough VMware method is a cut list of available gadgets. Even with a perfect configuration ready, you might only enable memory sticks and other storage devices, as well as USB dongles (that is, hardware keys).
Remote access to devices like cameras, mice, keyboards, chip terminals, card readers, and similar equipment is practically inaccessible for the manually configured USB passthrough in VMware. If you want to redirect any of these widely used instruments to your virtual machine, we recommend using specialized software like HighFigure USBoNet.
Software-Based USB Passthrough Method for VMware Systems
Is VMware USB passthrough not working? Highly likely, it’s time to use the software designed to simplify the USB connections to VM platforms. If you choose a quality, multi-functional application like USBoNet, you will be able to use just any device on your virtual machine.The app will let you connect devices not only plugged-in to your host computer but also available remotely through RDP and similar protocols. What is important here is that you do not have to work out any configurations manually. The software already provides a universal configuration to route your devices with a couple of clicks.
How to Enable USB Passthrough via USBoNet: Step-by-Step Guide
An application setup is required here, but the entire procedure is simple to undertake. It involves the following actions:
- Visit our official website.
- Download the VMware USB 3.0 passthrough application.
- Set up the software on your physical machine.
- Install the app on your VM, too.
- Use Gate Mode to enable remote access via RDP, etc. Install the application on all involved machines – it complies with various operating systems.
- Launch the app on your virtual machine.
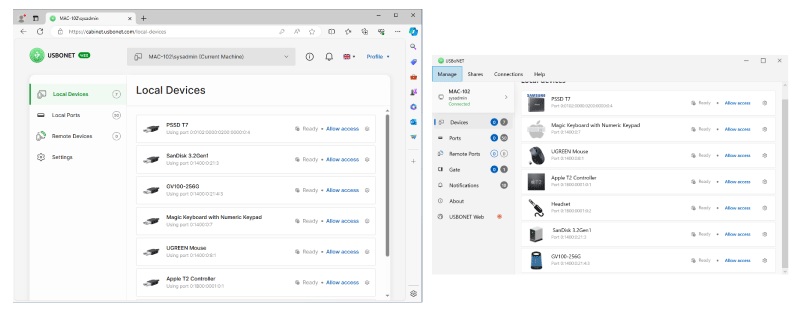
- Open the Device menu.
- Pick a device and tap the Allow Access line.

That’s it! The chosen gadget will be at your disposal now. Thanks to port virtualization, which is ensured by the app functionality, you’ll be able to employ all the devices connected to your physical computer. Just a click is enough to access any of them.
Advantages of USBoNET VMware Passthrough Software
The application is a high-quality product designed to make your USB redirects simple and effective. The software offers the following benefits:
Ease of Use
As soon as you run the app, you’ll see a well-thought-out interface with all the features you need. You may not even think about arbitrators or controllers. USBoNet is ready to route all the necessary peripherals to your VM, and you won’t need to build any configurations.
Functional Diversity
The USB passthrough VMware application represents a universal solution for remote access to physically connected gadgets. It is capable of sharing devices through various networks. The software allows users to add virtual machines and remote users, as well as regulate access permissions, etc. The interface includes the following options:
- WebAdmin is a cloud-based assistant that will let you control your sessions. You’ll be able to conduct remote installations, modify security configurations, etc.
- Gate Mode serves to create and manage a network with virtual or remote machines. For example, you can share a webcam or a similar gadget with remote users connected to the network. The gesture is ideal for synchronization processes within a forked system of remote machines.
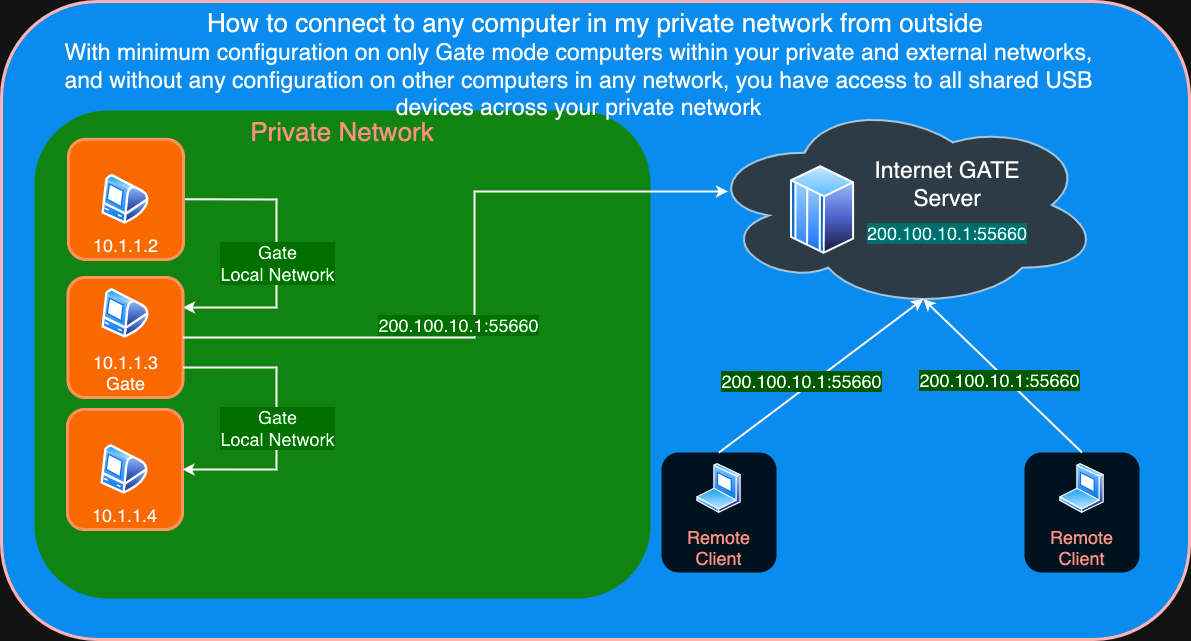
With minimum configuration on only Gate mode computers within your private and external networks, and without any configuration on other computers in any network, you have access to all shared USB devices across your private network 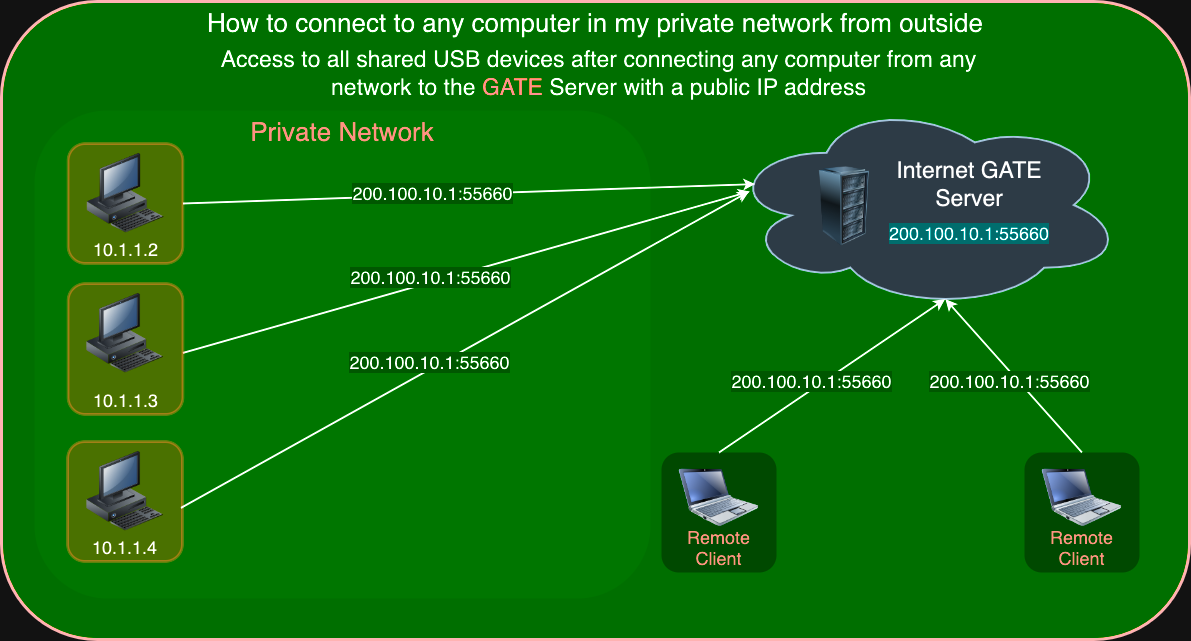
Access to all shared USB devices after connecting any computer from any network to the GATE Server with a public IP address 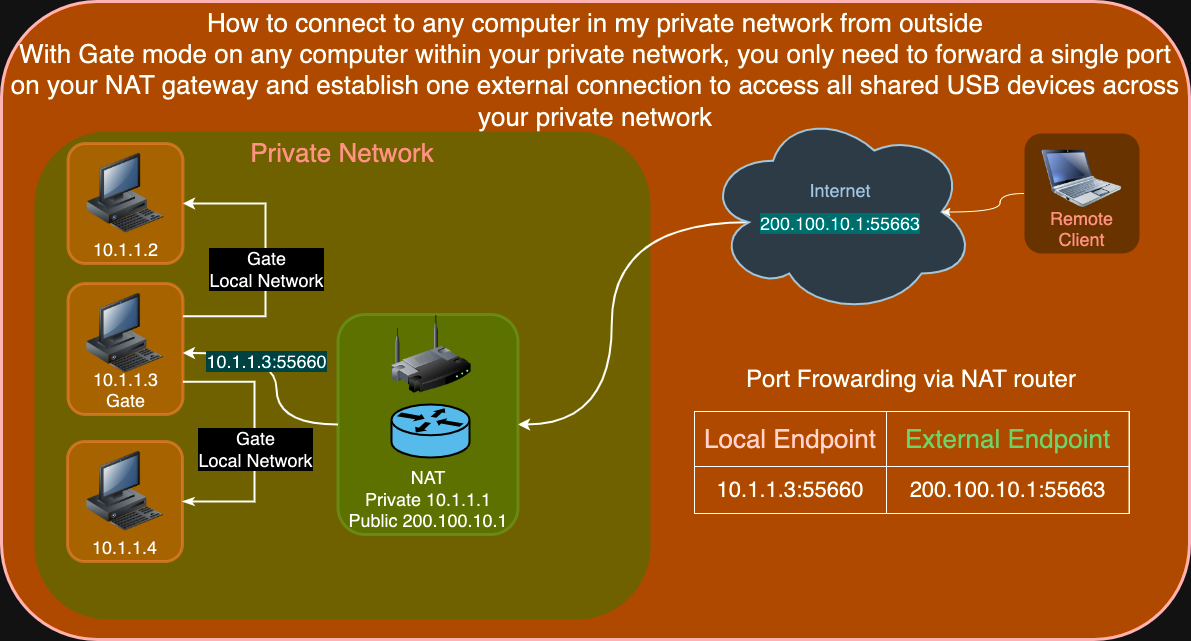
With Gate mode on any computer within your private network, you only need to forward a single port on your NAT gateway and establish one external connection to access all shared USB devices across your private network 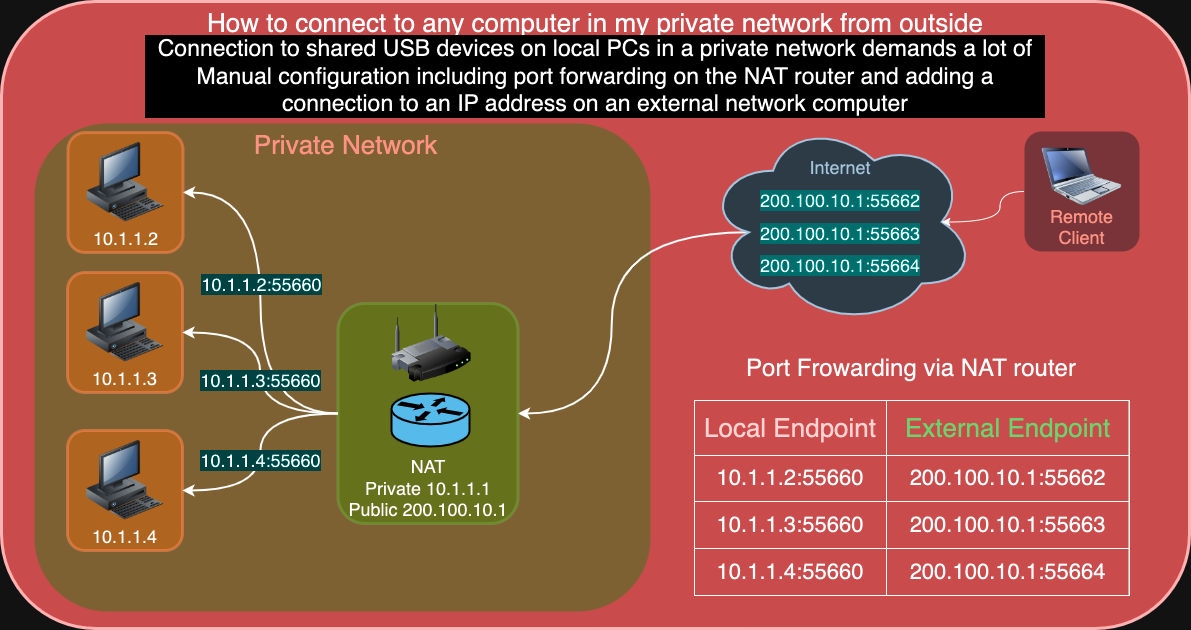
Connection to shared USB devices on local PCs in a private network demands a lot of Manual configuration including port forwarding on the NAT router and adding a connection to an IP address on an external network computer
- Device/User Isolation options allow you to fully control the usage of the USB devices on your VM. If you are running a network, you can also assign rights to users and monitor their activities.
Security
The USBoNet VMWare USB 3.0 passthrough app prioritizes security. With its help, our clients can ensure top-tier protection against unauthorized access to their devices and data. When using our software, you may not worry about possible errors and data losses while redirecting peripherals to your virtual machine.
Things to Consider Before Using USB Passthrough Software for VMware
If you consider opting for USB passthrough software, take several factors into account:
- The app is paid.
- You might encounter difficulties when transmitting isochronous devices to your VMware machine.
- You won’t be able to deal with isochronous gadgets via the native USB passthrough VMware method.
However, the USBoNet team is ready to offer all possible support to you to let you cope with the problem. As for the paid basis of the app, HighFigure offers a 14-day free trial, so you can start using the USBoNet application for free right away.