VirtualBox USB Passthrough
Have several operating systems installed via VirtualBox on your computer? Then, you might have experienced difficulties connecting USB devices to all of them. A universal solution to insufficient ports or problems with connection settings is the VirtualBox USB passthrough software from High Figure.
The program is easy to install and use. It will let you interconnect between your disks and enable USB on VirtualBox for all the necessary devices. How to install the VirtualBox extension software? How does it all work on Windows, Linux, MacOS, and other OS? What are the advantages of the USBoNet USB passthrough application over using the extension pack from VBox? All answers are given in this guide.

Installing the VirtualBox Extension Pack
Before revealing the benefits of HighFigure USB passthrough, let’s describe the possibilities and the installation process of the VBox extension pack onto your machine. The pack serves to extend your VirtualBox functional capabilities. The main one includes the following:
- Support of VBox Remote Desktop Protocol (VRDP).
- Webcam passthrough on the host machine.
- Intel PXE boot ROM.
- Cloud integration options.
- Disk image encryption based on AES.
As soon as the pack is set up, you can plug in and use multiple hardware items via virtual ports. Ideally, their physical connection to this or that OS should not affect the performance of the entire VirtualBox system.
Yet, practice shows that VirtualBox USB passthrough has a number of limitations, the problem of which can be solved with the help of top-advanced applications like USBoNET from HighFigure. However, let’s first describe the VBox extension pack setup process before revealing its possible drawbacks and workable solutions for them.
How to Install
The VBox extension pack setup process is plain. To ensure proper work of the USB passthrough software on your machine, make sure to take these steps:
- Ensure you have all the necessary VBox updates. It’s important to have all drivers and system components in their latest versions so that you do not encounter compatibility issues.
- Check the exact version of your VirtualBox to know which extension pack to install onto your machine. You can view the VBox package series in the Help Menu by tapping the ‘About VirtualBox’ section. Using the correct pack is crucial for your further experience with device communication via virtual machine USB ports.
- Visit the Oracle Downloads page in any browser available on your computer or set up the Oracle native app.
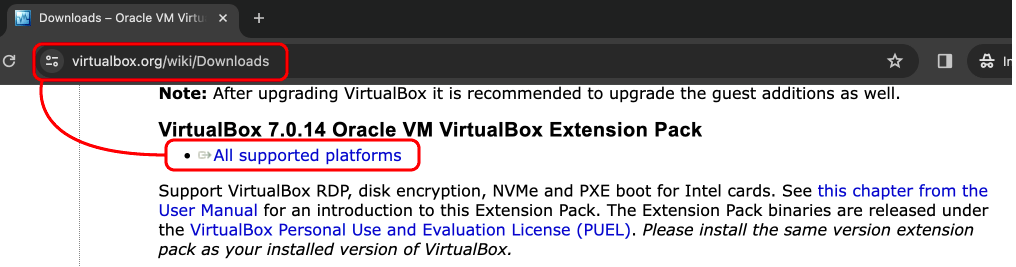
- Create an account.
- Download the extension pack that suits your VBox version.
- All guest machines in VirtualBox should be closed before running the installation procedure. This will protect your system against errors.
- Move ‘File’ → ‘Tools’ → ‘Extension Pack Manager.’
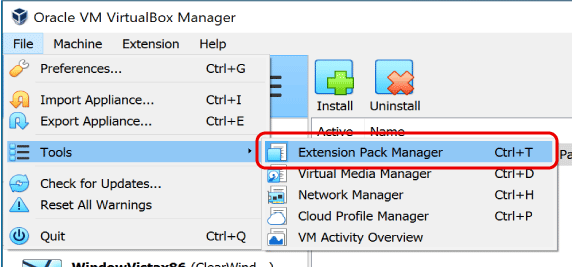
- Tap the downloaded extension version to initiate its setup. Remember to accept the User Agreement to proceed with the installation.
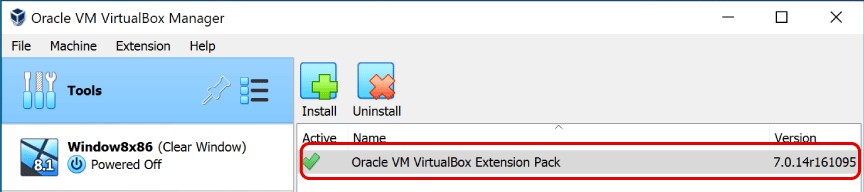
- Restart VBox. The extension pack changes will be applied automatically.
There can be kernel drive failures with VirtualBox on Mac devices after the extension pack setup and the launch of the USB passthrough. A universal solution to this problem is to set up the extension pack through the command line.
On Linux machines, you’ll need to create a VBox user group through which you can sign up and install the pack.
How Virtual USB Support Functions on Multiple Operating Systems
The idea of VirtualBox is to allow smooth interaction between various operating systems and devices connected to them. One operating system is chosen as a host one, while all the others will be the guest ones.
VirtualBox supports the 64-bit versions of the following OS types:
- Windows (8, 10, 11 21H2, Windows Server 2012, 2012 R2, 2016, 2019, and 2022);
- MacOS (10.15, 11, and 12);
- Linux (most OS based on kernel 2.6, 3.x, 4.x, and 5.x);
- Oracle Solaris 11.4.
At present, Oracle VBox offers a number of drivers for Virtual USB passthrough support on Windows. The support is pretty limited, and you might need to configure your own USB passthrough settings for your devices manually. You should be ready for limitations.
For instance, the most frequent issue happens when you try to access a device physically connected to the host computer via USB from a virtualized guest machine. You can use this device, but it will be unavailable on your host machine!
Thus, connecting environments via USB in a virtual machine system based on VBox may cause serious damage to your hardware. Imagine that a device is actively used or updated on your host machine at the moment. Then, you allow a guest machine to connect to it. The peripheral will be shut down instantaneously – without a safe shutdown procedure. The whole deal may end in device breakage or data loss.
Solving such issues is available but requires certain skills and an understanding of the VBox specialties for this or that OS. How to use USB in VirtualBox on a host platform? Let’s view how the VBox USB device management works on the top-used operating systems.
VirtualBox USB Windows Solution
Once you’ve installed the basic and extension packs, you can run VBox on Windows through the Programs menu. Some platforms will let you do it right through the Start menu. You can add/remove virtual machines, create VBox user groups, etc. VirtualBox employs VRDP, Virtual Remote Desktop Protocols, to let you monitor and control all the virtual machines in your system. The technology complies with the RDP solution from Microsoft, too.
How to connect USB to VirtualBox remote machines in the network? The same VRDP will let you view and manage local or remote peripherals plugged into a guest or host system.
What you should do is allow for Remote Desktop in Server Manager before connecting to Windows Server without VRDE. If Server Manager is not active, launch it through the Start section on Windows Server VM. Then, opt for Local Server and enable Remote Desktop in ‘Properties.’ Finally, enable the remote connection option on your computer and press OK.
VirtualBox USB Mac Support | Understanding VirtualBox Mac USB Functionality
If you need VBox on your macOS machine to virtualize a Windows OS, you can ensure USB device communication across your entire system, too.
You’ll have to take the following steps to connect USB to a Windows virtual machine through VirtualBox:
- Go to VBox.
- Ensure that the Windows virtual machine is not operating.
- Open ‘Settings’
- Set “Enable USB Controller”
- Plug in a device (physically).
- Tap the ‘Plus’ button to view the accessible devices.
- Choose the peripheral to connect via USB in your virtual machine system.
- Remove the USB appliance from your macOS machine.
- Run your Windows virtual machine and use the chosen device. Remember that you cannot use the peripheral on your Mac until you close the Windows guest machine.
That’s it. Yet, you should be careful with your choice of a USB controller when planning to enable devices via VirtualBox USB passthrough for macOS and Windows. We recommend using 2.0 since it functions much faster than 1.1 in VirtualBox. Do not let the system move to 3.0 at Step 7. This option is not supported in Windows VBox so far.
VirtualBox USB Linux Support | Understanding VirtualBox Linux USB Functionality
Allowing access to appliances on the Linux host system in VirtualBox has certain specialties. Let’s observe how VBox USB support works for the Linux OS through the example of Ubuntu.
- Open ‘Settings’ → ‘USB.’
- Opt for either the 2.0 or 3.0 controller.
- Connect a device.
- Use the ‘Add USB to VirtualBox,’ ‘Add a new USB filter to VirtualBox,’ or a similar section to enable the peripheral.
- Pick the device you need.
- Press ‘OK’ to make the appliance accessible across the VBox system.

Again, the chosen peripheral will be open to remote access, but it won’t be accessible on the host system. To make it available on Ubuntu, you’ll need to disallow it first. You should go to ‘Devices’ → ‘USB’ and uncheck it there.
VirtualBox USB Passthrough without Limitations or Complex Configurations
VirtualBox works perfectly when you simply need to use several operating systems on one physical machine at once. The problem is that you usually need to employ various USB devices across these operating systems. Here, VBox has a number of drawbacks.
The main downsides include the inability to access a peripheral on the host and guest machines simultaneously and the complexity of the system configuration in general. Moreover, you should take special care of your VirtualBox USB passthrough configuration since improper settings may cause grave problems with your equipment and data loss.
However, you can power up your VBox system with special software designed to simplify device communication in your VM system. In today’s market, High Figure USBoNET is one of the most effective virtual device management programs to help you tune up your USB passthrough sessions via VirtualBox.
To enable a device on VirtualBox with the help of USBoNET, you simply need to take these steps:
- Download/set up USBoNET.
- Run the program’s interface.
- Opt for ‘Device’ and pick the one you need to share across VBox.
- Press ‘Allow Access’ to complete the operation.
That’s all. There’s no need to configure anything!
The possibilities of the software are much broader. When it comes to VM VirtualBox systems, USBoNET offers smart port virtualization and features such as Gate Mode and WebAdmin, which are available even in a free version. These options, together with an intuitive interface, will let you access appliances in your network with a single click.
The software is based on Persistent USB Connection tech. This is a solution to the problem of insecure device shutdowns and exchanges of data. USBoNET is a secure solution thanks to such features as Elliptic Curve Encryption and USB Device Isolation.
Conclusion
In this article, we have explained how VirtualBox USB passthrough works. We gave detailed instructions on installing its extension pack and activating peripherals through USB on various operating systems.
Now, you know the limitations of USB passthrough from a device communication perspective. If connecting and sharing USB equipment across several operating systems is crucial for you, it is recommended that you use trusted applications like USBoNET.While VBox offers tricky support for USB passthrough, and you should be careful with your USB support configuration, USBoNET is ready to do practically the entire job instead of you. You receive a handy interface to smartly manage your VM VirtualBox system, with all devices controlled and enabled/disabled with a click.